
| Interesting Math Problem | Math Problems Home | Home | Send Feedback |
A blank field with a number of dots is presented.
Two players alternate turns, and on each turn the player must
connect two different dots which are not already connected to each other.
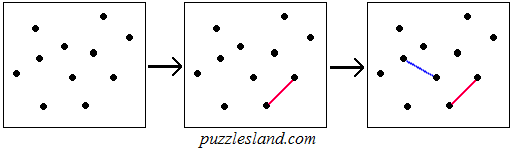
(The colors are just used to show alternation of moves -
all edges are equivalent and the all-nodes path can use any
combination.)
The winner is the player who makes a connection such that
there is a path, not necessarily unique, from any dot to any
other dot.
In graph theory terms, we start with a graph of n nodes and no edges. Each turn draws an edge of the graph, and the winner is the one who makes it a connected graph.
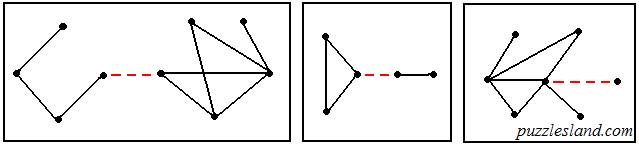
A winning position is one which consists of exactly two connected subgraphs,
as shown in these three separate examples.
An isolated node is considered to be a connected subgraph of one node.
In these cases, there are several choices for winning moves,
with one of them shown in dashed red.
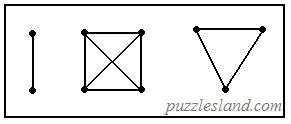 Therefore, it is a losing move to leave such a position.
The only situation which forces a player to do that is one where
there are three connected subgraphs, all of which are complete graphs
in their own right. (That is, no further edges can be added, because
every node is connected to every other node.) In the example at the right,
the next player to move must connect two of the subgraphs,
leaving just two, which the other
player can then connect into a single connected graph.
Therefore, it is a losing move to leave such a position.
The only situation which forces a player to do that is one where
there are three connected subgraphs, all of which are complete graphs
in their own right. (That is, no further edges can be added, because
every node is connected to every other node.) In the example at the right,
the next player to move must connect two of the subgraphs,
leaving just two, which the other
player can then connect into a single connected graph.
Thus, the analysis of the game comes down to the parity of the numbers of edges in various sized complete subgraphs.
Before continuing, the reader might enjoy trying to determine for himself when the first or second player has the advantage.
|
The number of edges in a complete graph of k nodes is k (k-1) / 2. Let us examine this table which shows, for various n (mod 4), the values of k (k-1) / 2 for k = n-2 and k = n-3. Ci denotes the number edges in a complete graph of n-i nodes. In the outer columns (n ~ (0 or 3) mod 4), the first player has a win, and in the middle columns (n ~ (1 or 2) mod 4), the second player does. (The cases of 2 and 3 nodes are exceptions, since the game ends in just one or two moves.) The numbers are related to the fact that complete subgraphs of {(n-2) 1 1} or {(n-3) 2 1} are simple losing positions to leave for the other player. While the pre-determined winner must always play carefully to avoid allowing his opponent to achieve a winning position, in columns 1 and 3, he has more flexibility than in columns 0 and 2. The odd columns offer {(n-2) 1 1} as a target as well as {(n-3) 2 1}, in addition to any others. Other subgraph combinations with the right parities produce the same result. Through computer simulations of the game, that does not appear to change the values of n for which the first or second player has the win, but I have not determined why it is the case that only one of the two players can guarantee victory (i.e, always find moves which eventually leave only losing positions for the opponent), starting from the beginning. For a formal mathematical analysis of the game, one can consult the work of Lßszl¾ Csirmaz on the "Connected Graph Game". |
|
The first player (designated P1 or Red) wants the losing position to be an odd number of moves from the start, and the second player (P2 or Blue) wants that to be even.
Here are some example positions, showing how many moves
complete the indicated subgraphs.
Those marked with X can be avoided by the winning player.
|
The games with either 4 or 5 nodes are very short.
Red (the first player) cannot fail to win in the case of 4, For 5 nodes, Blue (the second player) can make either a winning or losing move on his first chance. 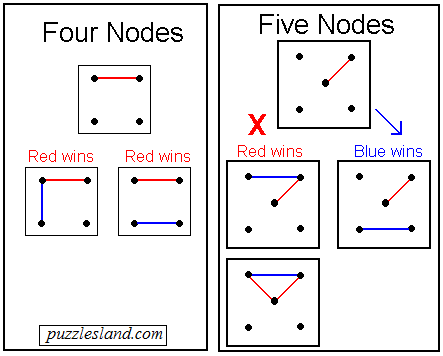
|
There is not a simple way to describe a strategy other than to say "Move toward your goal (if you are the theoretical winner), and avoid any possible positions where the opponent might reach his."
With computer simulations, games up to 17 nodes have been tried,
and the separation based on numbers of nodes has held.
| Nodes | 2 | 3 | 4 | 5 | 6 | 7 | 8 | 9 | 10 | 11 | 12 | 13 | 14 | 15 | 16 | 17 | |||||||||||||
| Winner | P1* | P2* | P1 | P2 | P2 | P1 | P1 | P2 | P2 | P1 | P1 | P2 | P2 | P1 | P1 | P2 | |||||||||||||
|
*Small cases which are exceptions to the rule:
If n ~ (0 or 3) mod 4, the winner is the First player.
If n ~ (1 or 2) mod 4, the winner is the Second player. |
|||||||||||||||||||||||||||||
Here are some fully worked out cases, for 6 through 9 nodes.
We will designate the player who plays first as Red
and the player who plays second as Blue.
Again, this is only a visual aid and all edges are considered equivalent.
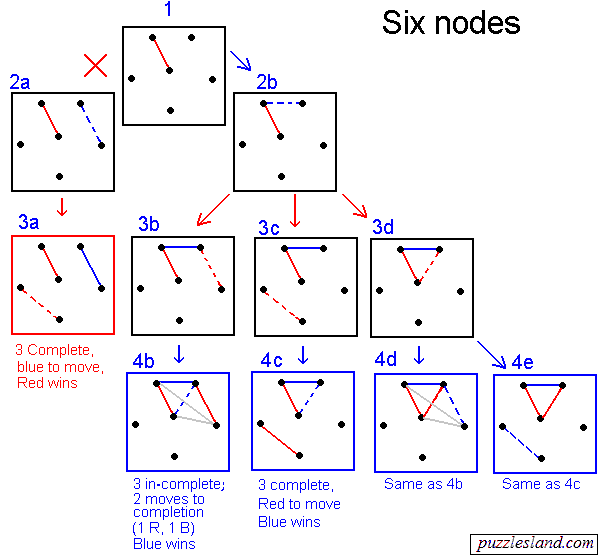
The case for 6 nodes is shown at the right.
Any first move is equivalent, as shown in diagram 1.
Blue has two inequivalent moves.
If he chooses the move shown as a dotted blue line in diagram 2a, then Red can respond with a similar move (3a), creating three complete subgraphs with 2 nodes, and a winning position {2 2 2}. So Blue chooses a different move.
The only other choice is to extend the first subgraph, as in diagram 2b.
Red then has three choices, but all lead to a win for Blue.
3b extends the existing subgraph to 4 nodes. Now there are 3 connected subgraphs, two of just a single node, and the other with four, which is n-2 (since n=6). Blue need only add to it and then wait until this subgraph is complete, which takes one red and one blue move from here (the gray lines in diagram 4b). Then Red must connect two subgraphs, leaving a winning position for Blue.
In 3c, Red tries making a new subgraph out of two of the isolated nodes. But this doesn't work any better, since Blue responds by completing the first subgraph (4c), leaving Red with 3 complete subgraphs, a losing position.
Finally in 3d, Red can try completing the first subgraph himself,
but then Blue has two choices, the same moves made by Red in 3b or 3c, leaving
either 4d and 4e, which are equivalent to 4b and 4c, respectively.
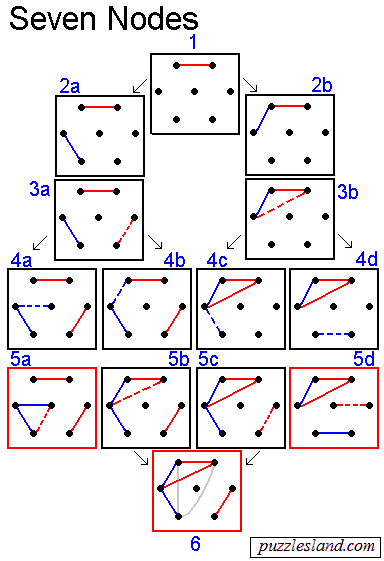
And again, there are two inequivalent second moves, to extend the first subgraph (2b) or start a new one (2a). In this case, both paths lead to a win for Red.
In the paths on the left, Blue makes a new subgraph in diagram 2a.
Red responds by making a third one. This position {2 2 2 1} (3a) forces Blue
into the choices of 4a and 4b, which lead to {3 2 2} (5a), or {4 2 1} (5b-6),
either of which complete on a Red move, and Blue loses.
On the right, it is similar: After Blue extends the original subgraph, Red completes it. Then Blue must make {4 1 1 1} (4c) which leads to {4 2 1} (5c) or Blue makes {3 2 1 1} (4d) which leads to {3 2 2} (5d). These are the same two positions as we found on the left side, and again, Red wins in both.
Note that at stage 4d, Red could make losing moves, creating either {5 1 1} or {3 3 1}. Instead he retains control of the game, and makes the winning move to create {3 2 2}.
The analysis for eight or nine nodes is longer, and
can be found HERE.